


How to Make Mini Photo Album
Today Paper House Creative Team member, Amber, shows us how to create a clever mini photo album that folds down to 4”x4” and opens up to 12x12”.
Watch how it unfolds in this quick video sequence.
What is a mini photo album?
Mini photo albums are a wonderful, portable, and fun way to create a cherished keepsake of a memorable occasion or a special person. Much like a standard scrapbook or photo album, examples of events you might include in a mini album are as follows:
- Special occasions (i.e., weddings, anniversaries, family reunions, birthdays, etc.)
- Time lapse (i.e., baby’s first year, restoration projects, etc.)
- Highlights from a trips or vacation
- Other adventures (i.e, day trips, date night, girls’ night out, etc.)
How are mini photo albums different from standard scrapbooks?
- The mini photo album Amber created is one-ninth the size of a standard 12”x12’ scrapbook when folded and closed.
- Because they are much smaller, mini photo albums require fewer supplies than a standard 12x12 photo album.
- Their small scale makes them faster to make than a full-sized scrapbook.
- Mini photo albums are easy to carry and will fit in most purses. This makes them great for sharing when visiting with friends. (We recommend storing mini albums in a ziplock bag to protect them when traveling.)
- Mini photo albums usually focus on one event or person, whereas a traditional scrapbook may include a variety of events that occurred during a specific timeframe.
How to create a mini photo album
Step 1 – Gather your supplies
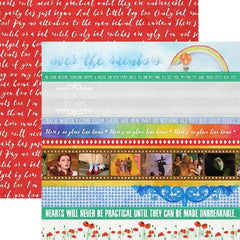
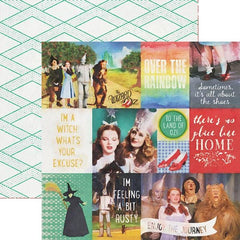
- 2 sheets of coordinating 12”x12” scrapbook paper. (At least one sheet should be double-sided.) Amber used the following scrapbook papers: Wizard of Oz Borders and Wizard of Oz Tags
![Wizard of Oz Borders scrapbook paper is multi-colored on side A and bright red with Wizard of Oz quotes printed in white letters]()
![Wizard of Oz tags scrapbook paper]()
- 12”x12” paper cutter with scoring blade
- Round corner punch (optional)
- Ribbon (approximately 2” long
- Photo-safe adhesive
- Embellishments (i.e., stickers, gems) (optional)
- Photos
Step 2 – Create your album base
- Select the double-sided paper that will be the base of your mini photo album and score it at 4” and 8” along the length.
- Rotate the paper 90 degrees and score along the width at 4” and 8”.
- Determine the top edge of your base. Cut the 4” score line downwards from the top to meet the first horizontal score line.
- Rotate the paper clockwise 90 degrees. Then cut the 4” score line downwards from the top to meet the first horizontal score line.
- Repeat 2 more times, until you have 4 cuts.
- Fold the paper inward on the remaining score lines. This creates 9 cells on each side of the base in which to add photos and journal snippets.
![Mini photo album cutting and folding diagram]()
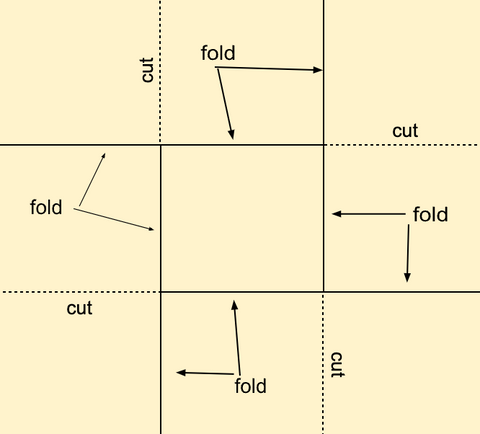
- We recommend cutting a thin sliver of paper from each cut so that the paper will be able to fold inward easily after additional layers are added. Each cut will then be approximately 1/8” wide.
- Optional: use a corner rounder punch on each corner of your base. (There will be 12 corners, including the 4 original corners of the paper.)
Step 3 – Add decorative layers
- Cut 9 squares, each measuring 3.75” x 3.75”, from your other piece of scrapbook paper. (Round their corners, if you wish.)
- Decide which cell will be your cover. (The outside center cell will be the back of your album.)
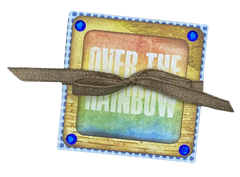
![mini photo album show folded and tied closed with a ribbon]()
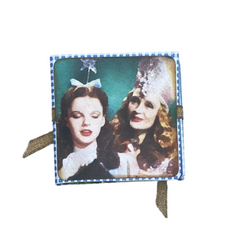
![back panel of mini photo album showing Dorothy and Glinda the Good Witch of the North]()
- With this in mind, glue the squares into 9 cells on both sides of the album base to break up their respective patterns. Add more squares if desired. This will require additional paper.
Step 4 – Add photos and embellishments
- Add photos to your album, considering the order in which your album will unfold.
- Continue decorating the cells of your album as you wish
Step 4 – Fold and finish
- Fold your album.
- Attach a ribbon to the back, then cover it with a square of coordinating scrapbook paper for a finished look. (See above.)
- Tie your album closed and take it with you to share with others!
Thank you, Amber, for this wonderful project and tutorial!